
Your backyard flooring sets the tone for everything that happens outdoors, from summer barbecues to quiet morning coffee. The right surface underfoot changes how you use the space and how it looks. In 2026, homeowners are moving beyond basic grass and concrete, choosing materials that blend durability, aesthetics, and practicality. Whether you’re upgrading a small patio or redesigning an entire yard, backyard flooring ideas span everything from natural stone to eco-friendly permeable surfaces. This guide walks you through your options and what actually works in real-world conditions.
Table of Contents
ToggleKey Takeaways
- Natural stone and slate pavers deliver timeless durability and premium aesthetics, though costs range from $15–25 per square foot plus installation labor.
- Concrete remains the most budget-friendly backyard flooring option at $3–8 per square foot, with upgrades like acid stain or stamped finishes adding visual appeal without breaking the bank.
- Composite decking outperforms pressure-treated wood long-term by avoiding rot and mold while requiring minimal maintenance, though upfront costs are higher at $8–15 per linear foot.
- Proper base preparation with 4–6 inches of compacted gravel and slope management (1/8–1/4 inch per foot) are critical to preventing drainage problems, cracking, and uneven settling.
- Permeable flooring and eco-friendly surfaces reduce stormwater runoff and meet municipal regulations, making them ideal for environmentally conscious homeowners building in areas with drainage requirements.
- Mixed-material approaches that combine stone near the house, gravel or permeable pavers in secondary zones, and wood accents create visually cohesive backyard flooring designs that balance durability and creativity.
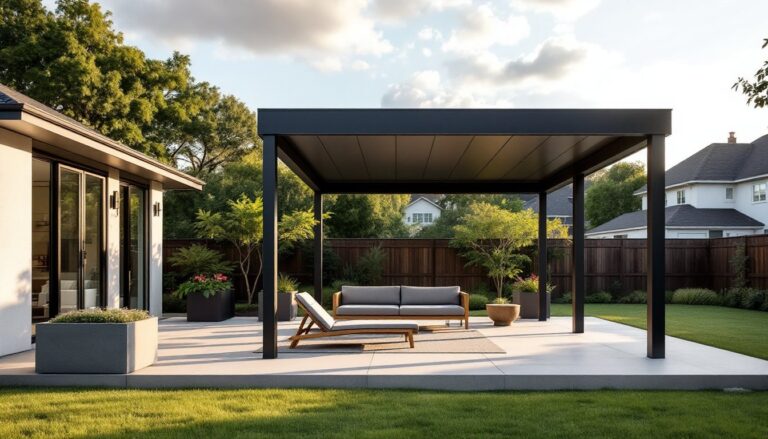
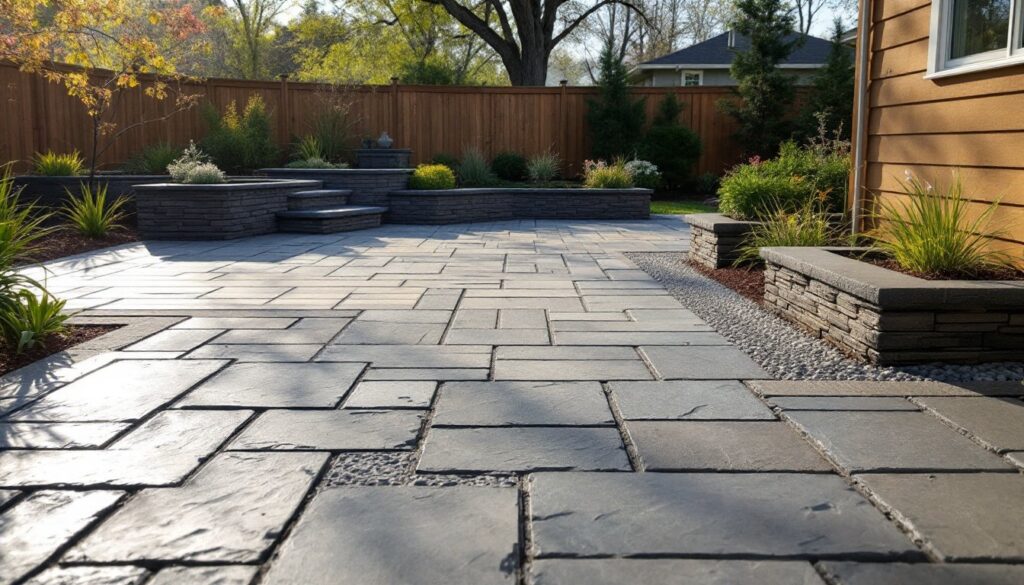
Natural Stone and Pavers
Natural stone delivers timeless appeal and unmatched durability. It handles freeze-thaw cycles, heavy foot traffic, and the weight of furniture without deteriorating the way some materials do. Stone feels premium underfoot and weathers beautifully over time, unlike some composite materials that fade or crack under UV exposure.
Slate and Flagstone Options
Slate and flagstone are the go-to choices for high-end outdoor flooring. Slate splits naturally into roughly rectangular pieces and ranges from gray to deep charcoal, often with subtle striations that add visual interest. Flagstone is a broader category, typically thicker and more irregular than slate, with warm tones ranging from tan to russet. Both materials offer excellent grip when wet, making them safer for poolside or wet-climate locations.
Installation requires a proper base: compact the soil, add 4–6 inches of gravel, and lay down a sand or mortar bed. Stones should be set on at least 1 inch of sand or 1½ inches of mortar, depending on traffic load. Joints are typically filled with polymeric sand or mortar to lock pavers in place and prevent weed growth. Polymeric sand hardens when wet, creating a stable, joint-locking system that’s easier to install than traditional mortar but still professional-grade.
One honest note: slate and flagstone aren’t cheap. Expect $15–25 per square foot for material alone, plus installation labor. If you’re doing it yourself, budget extra time for leveling and filling gaps correctly, rushing this step leads to uneven surfaces and drainage problems.
Hydrostatic pressure and standing water are enemies of natural stone patios. Slope your base slightly (about 1/8 inch per foot) to shed water away from structures like decks, sheds, or the house foundation. This prevents freeze-thaw damage in cold climates and mold growth in humid ones.
Wood and Composite Decking
Wood and composite decking are staples for raised outdoor flooring, offering warmth that stone can’t match. The key difference: wood requires more maintenance, composite demands less but costs more upfront.
Pressure-Treated vs. Composite Materials
Pressure-treated lumber (typically southern yellow pine or Douglas fir) is graded for outdoor use and rated to resist rot and insect damage for 15–40 years, depending on the preservative used. Cost: roughly $1–3 per linear foot for standard 2×6 boards. The tradeoff is annual staining, sealing, and occasional board replacement. Pressure-treated wood shrinks and twists as it dries, so expect minor gaps and warping over time.
Composite decking blends wood fibers and plastic, avoiding rot and splinters. It doesn’t need staining and resists fading better than natural wood. Brands like Trex and Azek dominate the market and perform well, but expect $8–15 per linear foot. Over a 25-year lifespan, total cost is often comparable to pressure-treated wood when factoring in maintenance.
For flooring specifically (not raised decks), consider interlocking wood or composite tiles. These snap together over a gravel or leveled base, making them easier to install than traditional decking and flexible for replacing damaged sections. Wood flooring options for outdoor spaces include tropical hardwoods like ipe and acacia, which are harder than pressure-treated pine but come with higher environmental and cost considerations.
When choosing between materials, think about your climate. In wet, humid regions, composite avoids mold and mildew issues that plague untreated wood. In dry climates, pressure-treated wood costs less and still lasts decades with basic sealing.
Safety note: All exterior wood flooring becomes slippery when wet. Add non-slip tape to high-traffic areas or apply an anti-slip coating during your sealing cycle.
Concrete Solutions for Budget-Friendly Backyards
Concrete is the workhorse of backyard flooring, affordable, durable, and straightforward to install or repair. Plain gray concrete costs $3–8 per square foot installed, making it the cheapest option by far. It’ll last 30+ years with minimal maintenance beyond the occasional pressure wash.
The downside: plain concrete can crack. Expansion and contraction from freeze-thaw cycles, ground settlement, or improper base prep causes ugly splits. To minimize cracking, install control joints (deliberate seams every 4–6 feet) before the concrete sets. These guide cracks into invisible lines rather than random patterns.
Upgrades boost appeal without huge expense. Acid stain creates mottled, natural-looking color variation for $1–3 per square foot applied cost. Stamped or textured finishes mimic stone, brick, or wood grain for $3–6 per square foot. These finishes enhance grip on slopes and around pools. Sealing (done every 2–3 years) protects against stains, extends life, and deepens color for exposed aggregate finishes.
For DIY concrete work, the learning curve is real. Pouring, screeding (leveling), and finishing concrete takes practice. Hire professionals for anything over 200 square feet or slopes steeper than 2%. A bad pour compromises drainage and durability, costing far more to fix than the savings from DIY.
Concrete plays well with other materials. Use it as a base layer, then add pavers or wood sections on top for visual interest. This hybrid approach gives you budget-friendly flooring with more personality than concrete alone.
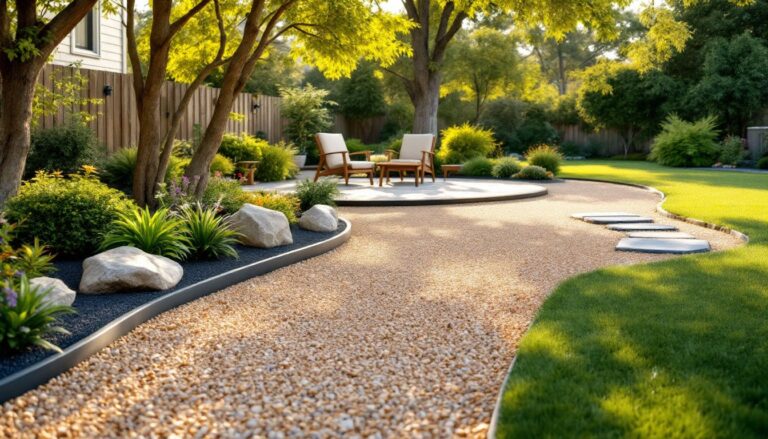
Permeable and Eco-Friendly Flooring Options
Permeable flooring lets water drain through to the soil below, reducing runoff and recharging groundwater. This matters more every year as municipalities tighten stormwater regulations and extreme weather events become common.
Permeable pavers (plastic grids filled with gravel, or porous concrete/clay units) cost $5–15 per square foot installed. Water passes through gaps or through the material itself, reducing the need for drainage systems. They’re ideal in yards where you can’t afford to lose green space to storm drains or where local codes require stormwater management.
Recycled rubber tiles and recycled plastic decking suit play areas or utility zones. They’re slip-resistant, softer underfoot than concrete, and outlast wood without the splinter risk. Expect $8–12 per square foot. Over time, plastic does degrade under UV exposure, not as severely as untreated wood, but noticeable after 10–15 years.
Gravel and mulch are the most budget-friendly eco option (roughly $0.50–2 per square foot annually, since material needs periodic replacement). They’re easy to install, look natural, and drain instantly. The catch: they compact and shift with foot traffic, requiring annual raking and topping. Gravel paths work better than gravel patios if you want a defined, low-maintenance surface.
Hybrid approaches work well. Combine permeable paver strategies with planted borders or drought-tolerant groundcovers around the edges. This gives you the durability of hardscape with the environmental benefits of permeability and green space.
Check local building codes before installing permeable systems. Some jurisdictions have specific requirements for base depth, gravel type, and drainage slope to ensure they function properly. What works in sandy, well-draining soil may not work in clay-heavy ground without modifications.
Hardscape Design Trends and Installation Tips
2026 backyard flooring trends emphasize mixed materials, defined zones, and transitions that feel intentional rather than haphazard. A successful design combines at least two materials, stone near the house for durability, gravel or permeable pavers in a secondary zone, wood accents along property lines.
Color coordination matters more than people realize. Pull your flooring colors from the house exterior, landscape plants, or hardscape features like fencing. Slate-gray pavers, weathered composite decking, and concrete with acid stain create cohesion. Mismatched materials feel jarring: coordinated ones feel designed.
Slope and drainage are non-negotiable fundamentals. Every outdoor surface must shed water. Aim for 1/8–1/4 inch of slope per foot away from structures. Standing water rots wood, freezes and heaves pavers, and breeds mold. If your yard is naturally flat, you may need a perimeter drain or a subtle berm (raised area) to channel runoff.
Prep work determines success. Remove old sod or damaged pavement completely. Compact the base soil, then add 4–6 inches of compacted gravel (crushed stone, not smooth river rocks, which shift). Use a hand tamper for small areas or rent a plate compactor for anything larger. Proper base prep is 60% of the job, rush it and your flooring will move, crack, or settle unevenly within a year.
For larger projects, consider hiring a hardscape contractor for the heavy lifting, excavation, grading, and base compaction. You can finish details like jointing pavers or applying stain yourself to save labor costs. Many homedit-featured designs showcase mixed-material approaches that balance professional polish with DIY-friendly execution.
Always check local building codes and zoning requirements before starting. Some areas require permits for patios over 30 or 50 square feet, especially if attached to the house. Setback requirements may limit how close you can build to property lines. A quick chat with your city or county assessor saves headaches later.
Choosing the Right Backyard Flooring for Your Space
The best backyard flooring matches your climate, budget, maintenance tolerance, and how you actually use the space. Stone lasts forever but costs more and requires careful installation. Concrete is cheap and durable but needs upgrades to look polished. Wood offers warmth but demands regular care. Permeable systems ease environmental impact but need proper base and drainage design.
Start by assessing soil drainage, frost depth in your climate, and how much traffic your patio will handle. Mix materials if budget allows, durability near the house, creative finishes in focal areas, and permeable zones where runoff matters. Don’t skip prep work, and be honest about your DIY skill level. A well-installed concrete pad beats a cracked stone patio every time. Get the foundation right, and your backyard flooring will serve beautifully for decades.